Spring Boot 启动
SpringBoot的启动类很简单,只需要调用SpringApplication的run方法即可,这篇文章来分析一下SpringBoot的启动类SpringApplication初始化的过程。
1
2
3
| public static void main(String[] args) {
SpringApplication.run(Application.class, args);
}
|
在SpingApplication 中 初始化了一个SpringApplication, 参数是当前SpringBoot启动的类
1
2
3
| public static ConfigurableApplicationContext run(Class<?>[] primarySources, String[] args) {
return new SpringApplication(primarySources).run(args);
}
|
SpringApplication初始化
- 从classpath推断
webApplicationType
- 设置Initializers
- 设置Listeners
- 推断main class,主要用于log print以及banner print
1
2
3
4
5
6
7
8
9
| public SpringApplication(ResourceLoader resourceLoader, Class<?>... primarySources) {
this.resourceLoader = resourceLoader;
Assert.notNull(primarySources, "PrimarySources must not be null");
this.primarySources = new LinkedHashSet<>(Arrays.asList(primarySources));
this.webApplicationType = WebApplicationType.deduceFromClasspath();
setInitializers((Collection) getSpringFactoriesInstances(ApplicationContextInitializer.class));
setListeners((Collection) getSpringFactoriesInstances(ApplicationListener.class));
this.mainApplicationClass = deduceMainApplicationClass();
}
|
推断webApplicationType
从classpath推断 webApplicationType , 主要有三种,NONE/SERVLET/REACTIVE
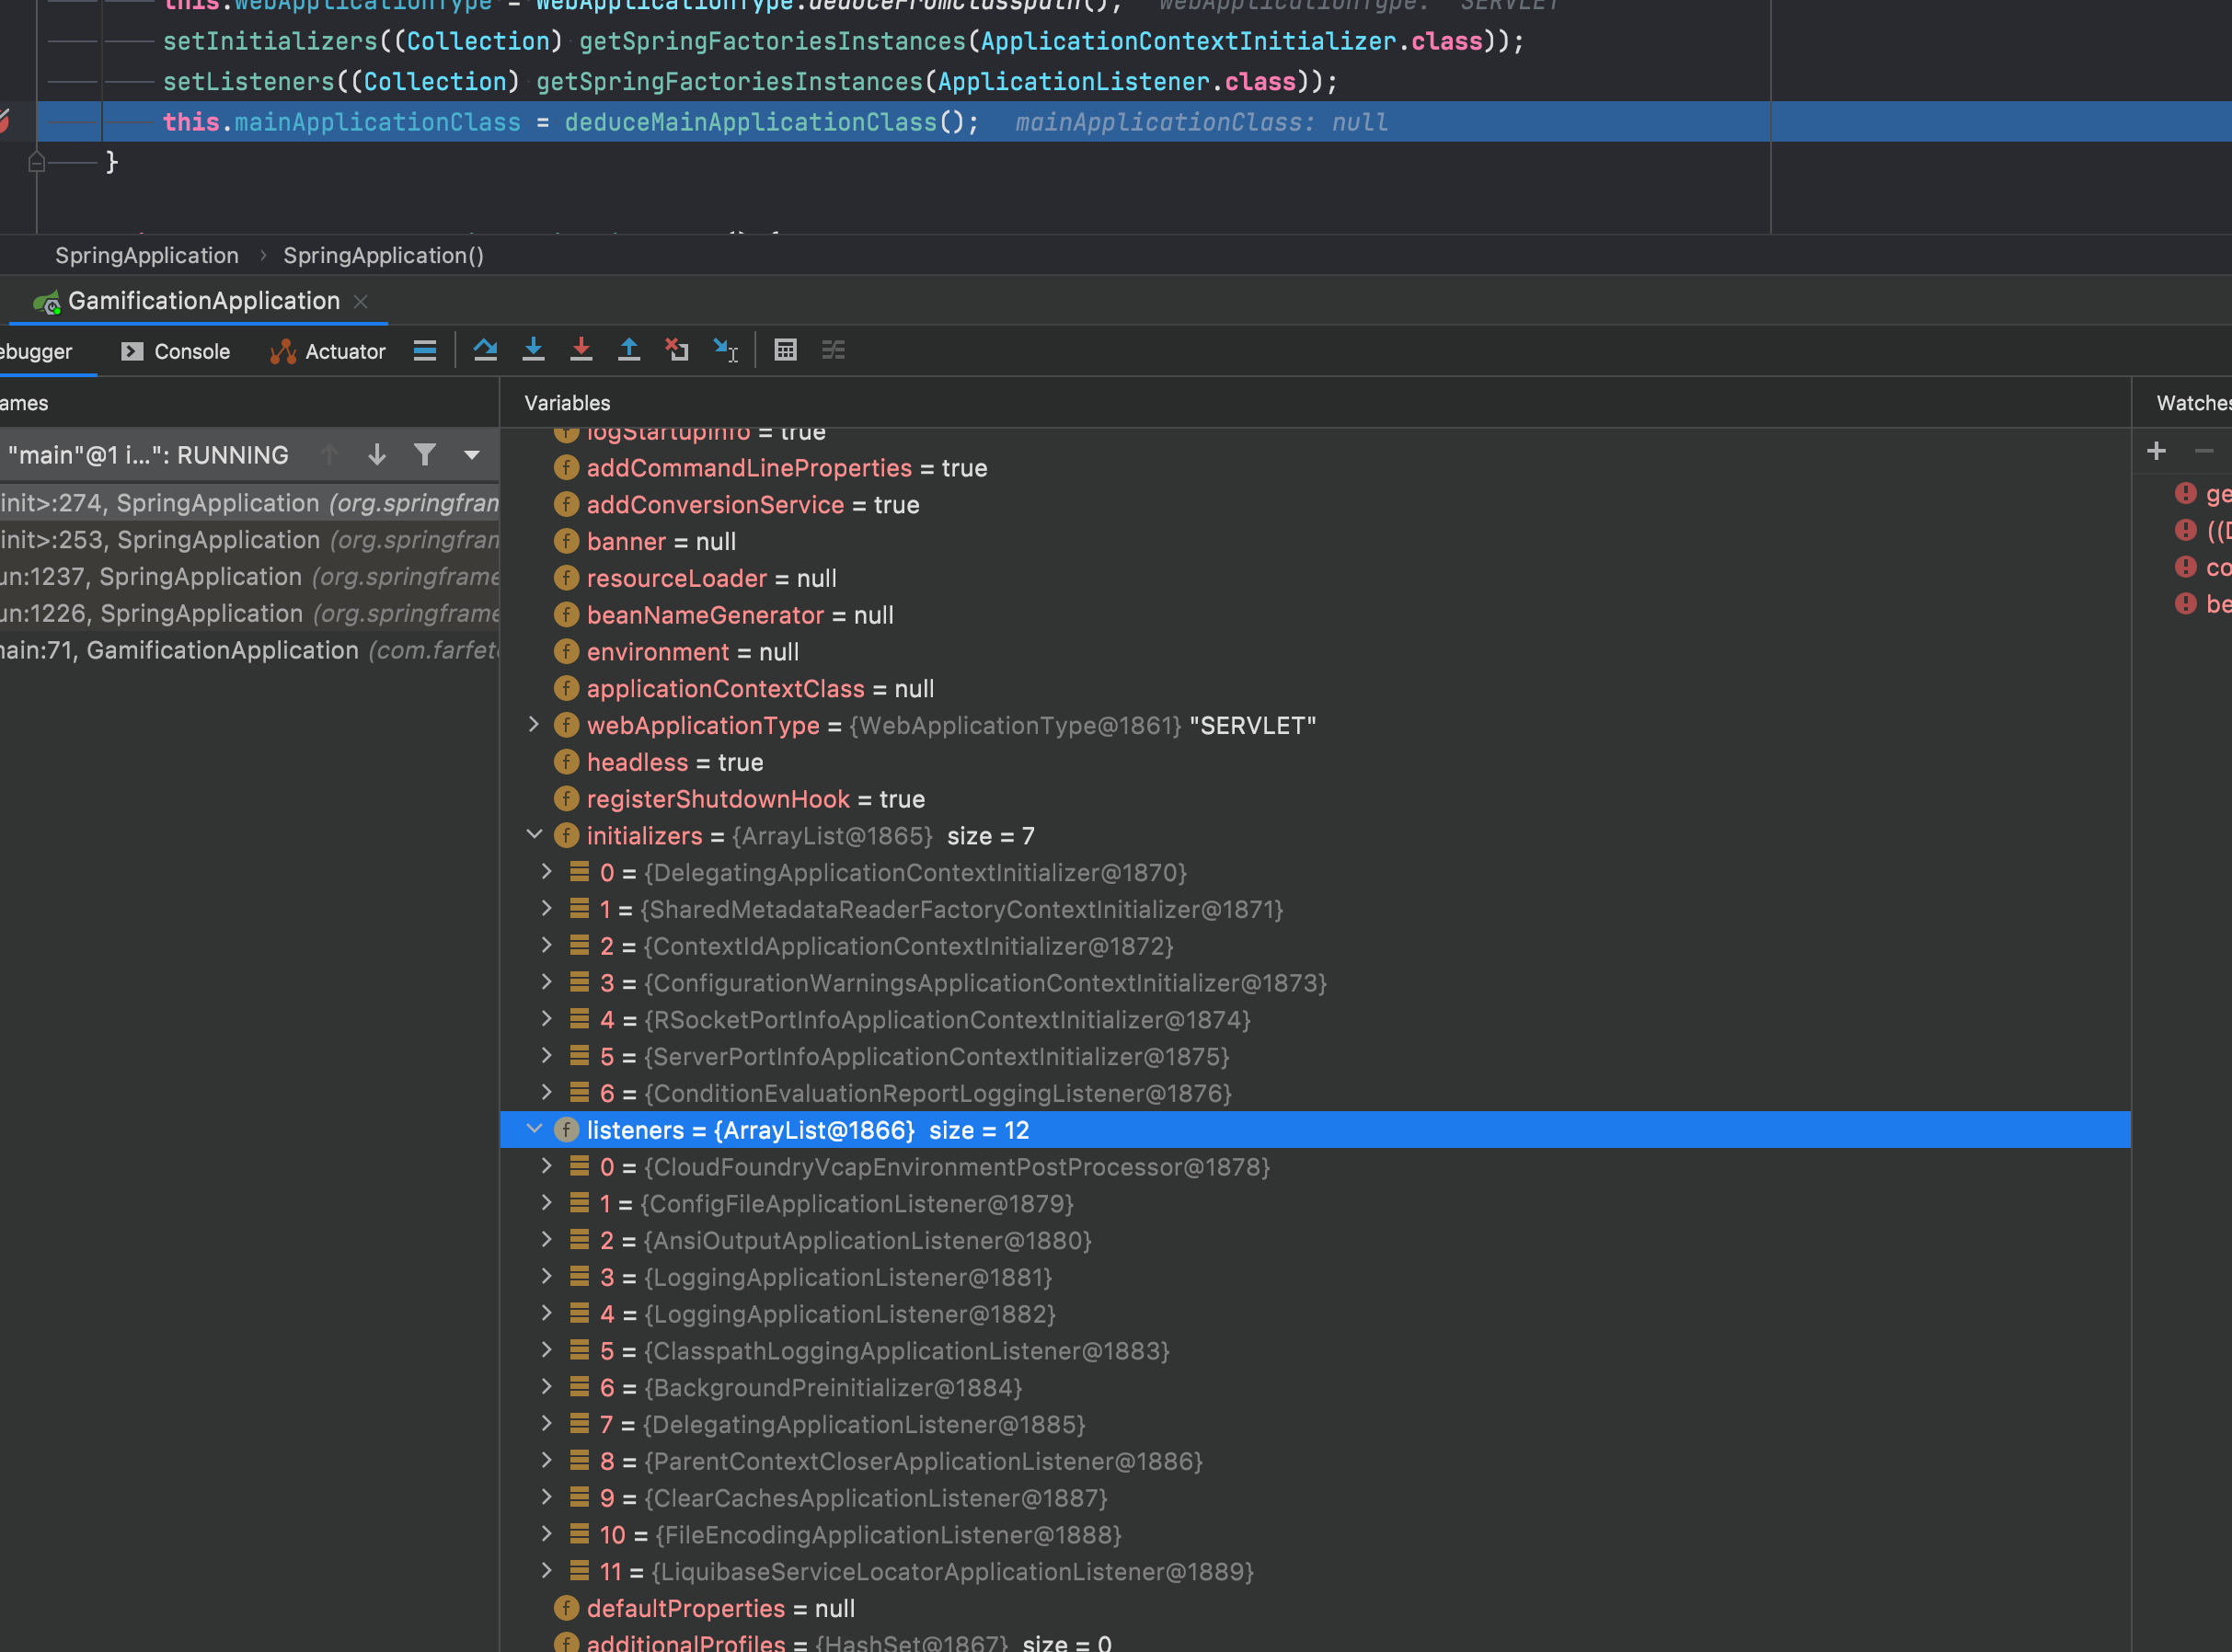
默认情况下是SERVLET,也就是说Springboot会默认启动一个embed的tomcat服务器,用的也是最广泛的。
设置Initializers和Listeners
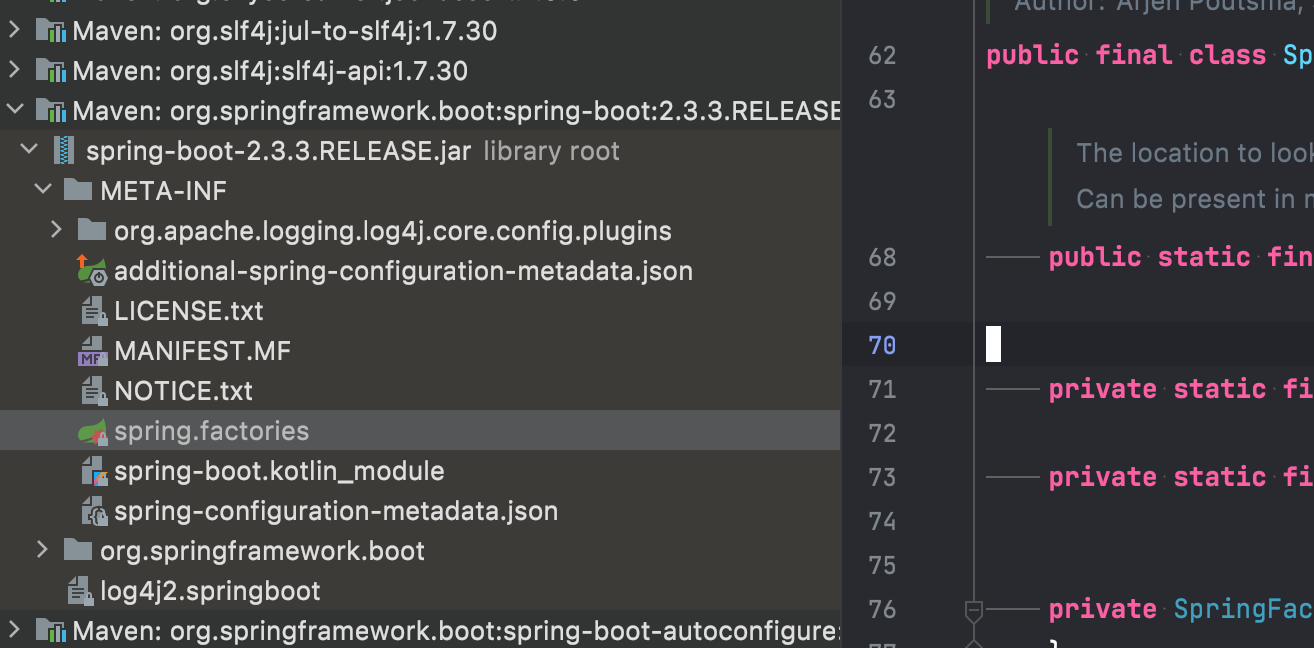
设置Initializers和设置Liteners 都是通过spring.factories来加载的

从源码中分析
getSpringFactoriesInstances
1
2
3
4
5
6
7
8
| private <T> Collection<T> getSpringFactoriesInstances(Class<T> type, Class<?>[] parameterTypes, Object... args) {
ClassLoader classLoader = getClassLoader();
Set<String> names = new LinkedHashSet<>(SpringFactoriesLoader.loadFactoryNames(type, classLoader));
List<T> instances = createSpringFactoriesInstances(type, parameterTypes, classLoader, args, names);
AnnotationAwareOrderComparator.sort(instances);
return instances;
}
|
SpringFactoriesLoader.loadFactoryNames
主要作用是从Springboot的jar包中加载 spring.factories文件
1
2
3
4
5
6
7
8
9
10
11
12
13
14
15
16
17
18
19
20
21
22
23
24
25
26
27
28
29
30
31
32
| public static final String FACTORIES_RESOURCE_LOCATION = "META-INF/spring.factories";
private static Map<String, List<String>> loadSpringFactories(@Nullable ClassLoader classLoader) {
MultiValueMap<String, String> result = cache.get(classLoader);
if (result != null) {
return result;
}
try {
Enumeration<URL> urls = (classLoader != null ?
classLoader.getResources(FACTORIES_RESOURCE_LOCATION) :
ClassLoader.getSystemResources(FACTORIES_RESOURCE_LOCATION));
result = new LinkedMultiValueMap<>();
while (urls.hasMoreElements()) {
URL url = urls.nextElement();
UrlResource resource = new UrlResource(url);
Properties properties = PropertiesLoaderUtils.loadProperties(resource);
for (Map.Entry<?, ?> entry : properties.entrySet()) {
String factoryTypeName = ((String) entry.getKey()).trim();
for (String factoryImplementationName : StringUtils.commaDelimitedListToStringArray((String) entry.getValue())) {
result.add(factoryTypeName, factoryImplementationName.trim());
}
}
}
cache.put(classLoader, result);
return result;
}
catch (IOException ex) {
throw new IllegalArgumentException("Unable to load factories from location [" +
FACTORIES_RESOURCE_LOCATION + "]", ex);
}
}
|
使用Classloader 从FACTORIES_RESOURCE_LOCATION加载Resource,然后根据resource来解析成为Properties文件,然后再解析成Map.
createSpringFactoriesInstances
这一步的目的是根据上一步load出来的Class来创建Factory实例,使用反射的方式进行创建
1
2
3
4
5
6
7
8
9
10
11
12
13
14
15
16
17
18
|
private <T> List<T> createSpringFactoriesInstances(Class<T> type, Class<?>[] parameterTypes,
                                                   ClassLoader classLoader, Object[] args, Set<String> names) {
    List<T> instances = new ArrayList<>(names.size());
    for (String name : names) {
        try {
            Class<?> instanceClass = ClassUtils.forName(name, classLoader);
            Assert.isAssignable(type, instanceClass);
            Constructor<?> constructor = instanceClass.getDeclaredConstructor(parameterTypes);
            T instance = (T) BeanUtils.instantiateClass(constructor, args);
            instances.add(instance);
        }
        catch (Throwable ex) {
            throw new IllegalArgumentException("Cannot instantiate " + type + " : " + name, ex);
        }
    }
    return instances;
	}
|

默认的Spring boot包中的spring.factories中有5个initializer,spring boot autoconfig 中有2个initializer
推断包含main方法的主类
主要是根据StackTrace遍历当前的方法调用栈拿到主类。
SpringApplication Run 方法解析
1
2
3
4
5
6
7
8
9
10
11
12
13
14
15
16
17
18
19
20
21
22
23
24
25
26
27
28
29
30
31
32
33
| public ConfigurableApplicationContext run(String... args) {
long startTime = System.nanoTime();
DefaultBootstrapContext bootstrapContext = createBootstrapContext();
ConfigurableApplicationContext context = null;
configureHeadlessProperty();
SpringApplicationRunListeners listeners = getRunListeners(args);
listeners.starting(bootstrapContext, this.mainApplicationClass);
try {
ApplicationArguments applicationArguments = new DefaultApplicationArguments(args);
ConfigurableEnvironment environment = prepareEnvironment(listeners, applicationArguments);
configureIgnoreBeanInfo(environment);
Banner printedBanner = printBanner(environment);
context = createApplicationContext();
exceptionReporters = getSpringFactoriesInstances(SpringBootExceptionReporter.class,
new Class[] { ConfigurableApplicationContext.class }, context);
prepareContext(context, environment, listeners, applicationArguments, printedBanner);
refreshContext(context);
afterRefresh(context, applicationArguments);
stopWatch.stop();
if (this.logStartupInfo) {
new StartupInfoLogger(this.mainApplicationClass).logStarted(getApplicationLog(), stopWatch);
}
listeners.started(context);
callRunners(context, applicationArguments);
}
catch (Throwable ex) {
handleRunFailure(context, ex, exceptionReporters, listeners);
throw new IllegalStateException(ex);
}
return context;
}
|
createBootstrapContext
BootstrapContext的主要作用是在ApplicationContext prepared之前提供singletons的lazy access活着是共享给其他类访问。
在ApplicationContext prepared完成 [[Spring Boot 初始化#prepareContext]]之后BootstrapContext就会被close掉,然后广播一个BootstrapContextClosedEvent给到其他Bean
prepareEnvironment
- 根据webApplicationType创建Environment
- 配置Environment
- attach ConfigurationPropertySource也就是ConfigurationProperties到environment
- 给SpringApplicationRunListener 广播environmentPrepared的Event
- Bind Environment to Spring Application
1
2
3
4
5
6
7
8
9
10
11
12
13
14
15
| private ConfigurableEnvironment prepareEnvironment(SpringApplicationRunListeners listeners,
ApplicationArguments applicationArguments) {
ConfigurableEnvironment environment = getOrCreateEnvironment();
configureEnvironment(environment, applicationArguments.getSourceArgs());
ConfigurationPropertySources.attach(environment);
listeners.environmentPrepared(environment);
bindToSpringApplication(environment);
if (!this.isCustomEnvironment) {
environment = new EnvironmentConverter(getClassLoader()).convertEnvironmentIfNecessary(environment,
deduceEnvironmentClass());
}
ConfigurationPropertySources.attach(environment);
return environment;
}
|
create Environment
根据applicationType来判断初始化哪个Environment
1
2
3
4
5
6
7
8
9
10
11
12
13
| private ConfigurableEnvironment getOrCreateEnvironment() {
if (this.environment != null) {
return this.environment;
}
switch (this.webApplicationType) {
case SERVLET:
return new StandardServletEnvironment();
case REACTIVE:
return new StandardReactiveWebEnvironment();
default:
return new StandardEnvironment();
}
}
|
Create Context
SpringBoot默认创建的是 AnnotationConfigApplicationContext
1
2
3
4
5
6
7
8
9
10
11
12
13
14
15
16
17
18
19
20
21
22
23
| protected ConfigurableApplicationContext createApplicationContext() {
Class<?> contextClass = this.applicationContextClass;
if (contextClass == null) {
try {
switch (this.webApplicationType) {
case SERVLET:
contextClass = Class.forName(DEFAULT_SERVLET_WEB_CONTEXT_CLASS);
break;
case REACTIVE:
contextClass = Class.forName(DEFAULT_REACTIVE_WEB_CONTEXT_CLASS);
break;
default:
contextClass = Class.forName(DEFAULT_CONTEXT_CLASS);
}
}
catch (ClassNotFoundException ex) {
throw new IllegalStateException(
"Unable create a default ApplicationContext, please specify an ApplicationContextClass", ex);
}
}
return (ConfigurableApplicationContext) BeanUtils.instantiateClass(contextClass);
}
|
初始化AnnotationConfigApplicationContext的过程中做了这么几件事情:
初始化DefaultListableBeanFactory
AnnotationConfigApplicationContext继承了GenericApplicationContext ,所以默认构造器会自动创建DefaultListableBeanFactory的实例,以供后面register beanDefinition和生成bean使用。
初始化 AnnotatedBeanDefinitionReader
- 处理
@Conditional 注解
AnnotationConfigUtils.registerAnnotationConfigProcessors() 注册几个处理注解Processors的BeanDefinition到BeanFactory的BeanDefinationMap中,这个是为了在refresh的过程中处理Configuration Class,也就是常说的配置类,这几个Processor分别是:
- ConfigurationClassPostProcessor 用来解析带有@Configuration的类,这个可以参考我之前的文章:ConfigurationClassPostProcessor处理BeanDefinition解析
- AutowiredAnnotationBeanPostProcessor 用来解析Autowired注解,InstantiationAwareBeanPostProcessor,这个特殊的BPP几乎就是在Spring框架内部使用的接口,主要用来处理代理对象或者需要Lazy init的对象的场景使用。
- CommonAnnotationBeanPostProcessor,也是一个
InstantiationAwareBeanPostProcessor,这个BPP主要用来解析JSR-250注解,比如@PostConstruct,@PreDestry等等
- PersistenceAnnotationBeanPostProcessor也是一个
InstantiationAwareBeanPostProcessor,主要是支持JPA的 @PersistenceContext和@PersistenceUnit注解
- EventListenerMethodProcessor 主要功能把注册在方法上的
@EventListener生成独立的ApplicationListener实例,实现Spring的事件驱动。
- DefaultEventListenerFactory 结合上面的EventListenerMethodProcessor一起来看,主要是为生成ApplicationListener实例提供默认的工厂方法。
初始化 ClassPathBeanDefinitionScanner
- set environment
- set Resource loaders
prepareContext 准备springboot应用的上下文
- set environment 绑定environment到Context
- postProcessApplicationContext
- registerBeanNameGenerator 可以自定义Bean名字
- set resource loader
- set conversion Service 这里用到了DCL 单例模式
- applyInitializers
- Add boot specific singleton beans
- springApplicationArguments
- spring bootBanner
- 处理lazy-initialization
- load beanDefinition到context中
这里面最重要一步是创建BeanDefinitionLoader,BeanDefinitionLoader是springboot的一个加载BeanDefinition的Loader,它可以加载各种各样形式的source,比如package, Configuration class, xml文件,groovy bean等
1
2
3
4
5
6
7
8
9
10
11
12
| BeanDefinitionLoader(BeanDefinitionRegistry registry, Object... sources) {
Assert.notNull(registry, "Registry must not be null");
Assert.notEmpty(sources, "Sources must not be empty");
this.sources = sources;
this.annotatedReader = new AnnotatedBeanDefinitionReader(registry);
this.xmlReader = new XmlBeanDefinitionReader(registry);
if (isGroovyPresent()) {
this.groovyReader = new GroovyBeanDefinitionReader(registry);
}
this.scanner = new ClassPathBeanDefinitionScanner(registry);
this.scanner.addExcludeFilter(new ClassExcludeFilter(sources));
}
|
BeanDefinitionLoader的作用就是循环各个 sources 然后创建对应的BeanDefinition然后load到applicationContext 中,解析注解配置的类可以参考之前的文章Spring加载BeanDefinition源码解析 | Hank’s Blog
refreshContext
上面的阶段只是把bean Definition加载进了context,到了refresh阶段了才会真正生成bean实例,这里spring boot做的工作基本上就结束了,接下来就要交给spring 底层了。
refresh的主要代码在AbstractApplicationContext的refresh方法中,这个后面会专门再写一篇文章。
References
- GitHub - spring-projects/spring-boot: Spring Boot
- GitHub - spring-projects/spring-framework: Spring Framework
- Core Technologies

